The newcard, The New School's official identification card, gives you access to university buildings and services at various campus facilities, including academic technology labs, libraries, the equipment center, vending, and select laundry locations. You must present your newcard when you attend events on campus. If you participate in the Dining Dollars or Newcard Cash programs, your newcard can be used as a debit card at campus dining facilities and, with Newcard Cash, certain off-campus merchants. You can also use your newcard to receive student discounts at many local businesses and venues.
You can now submit your favorite passport-style photo for a preprinted card. Your ID photo will also become your profile photo for the New School portal, my.newschool.edu, so we suggest you choose carefully.
To begin, click on the “Get Started Now” button located on the Home page.

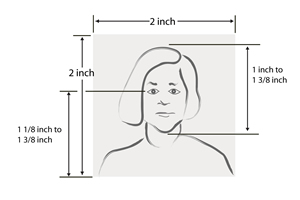
The above photos represent acceptable photos. Notice that they are very similar in size and requirements to passport photos. When taking your photo, please use the following as guidelines to ensure your photo is accepted:
- Large image size
- A natural expression
- Head should be directly facing the camera
- Photo should capture head and shoulders, with eyes open and looking at the camera. You’ll be able to crop your photo later
- Lighting should be adjusted to avoid shadows on the face or background
- Background should be plain white or a uniform pale color
- Photo must be in color
- Eyeglasses should be worn if normally used; glare on eyeglasses can usually be avoided with a slight upward or downward tilt of the head
- Do not wear sunglasses
- Photos that have been filtered or modified with AI technology will not be accepted
- Include headpieces if worn daily for religious purposes; they should not obscure or cast shadows on the eyes or any other part of the face
Once you have reviewed the detailed instructions and have a properly formatted photo, please proceed to Step 2. You will have the ability to crop your photo if needed.
- Proceed to Step 2 by clicking in the box presented to you on Step 1 of the MyPhoto Site as shown below and then clicking on the box that says “Continue to Step 2”:

This page displays your account information used by MyPhoto:

Click on the “Choose File” button to browse for the photo. This will launch a dialog box in your browser. You can select the location of your file. Once you have selected the photo file’s location, select it by clicking on the “Open” button in the dialog box.
- Click the “Continue To Step 3” button to upload your photo to the system.

If needed, you can use this online tool to crop or resize your photo. After you are finished, you will be able to compare your photo with a sample provided. After cropping or resizing your photo if necessary, continue to Step 4. You can also remove the file and start over.
Click on the button that says “Continue to Step 4”

Step 4 will display a sample photo. Compare the sample photo with your uploaded photo.
- Click on the radio button that answers the following question:
Does your photo look like the given example?
- If you selected no, and would like to choose a different photo, please check the box below, and then click "Continue to Step Five". You will be taken back to Step Two to upload a different photo."
- If you selected yes, continue to the next paragraph that explains your acceptance
and understanding of submitting your photo using this on-line tool:
“I have reviewed the necessary photo requirements of MyPhoto. I understand that if I submit a photo that does not meet the requirements or is improperly formatted, my application may be delayed until a suitable photo is resubmitted. I hereby certify that the information provided is correct and the photo I am uploading is a true image of myself. I understand that this photo may become part of my official record and can be used for official purposes. By submitting this photo for my ID I agree that this photo may be used for the New School’s internal database, and that faculty and staff photos may be displayed online.”
- Click on the box that says “Submit Photo.” This will submit the uploaded photo to the MyPhoto Site system.

If your photo has been uploaded successfully, a confirmation message will display that will contain your tracking number as shown below:
Thank you for submitting your photo.
Your photo has been successfully uploaded to our database.
(You will be provided with a tracking number to track the status of your photo.)